Plugin Tutorial Part 2 - Harold's Idle Poses


This is the second post in a four part tutorial series to help you work with TAA_CharacterPoses plugin. On part 1 we focused on Harold's default and dash poses, now we're spicing thins up a little and giving him two idle poses!
All configurations described here are already done in my sample project, which you can download here.
OBS: All images used in the tutorial series were taken from the MV editor. If you're an MZ owner don't worry, the setup I'll explain here is pretty much the same on both. The only difference is really on Plugin Commands, which are actually easier to use in MZ than MV.
Idle pose 1
We'll start with a more complex one, so I can explain how it works in details, and then we'll do a simpler one.
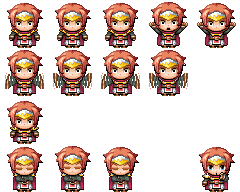
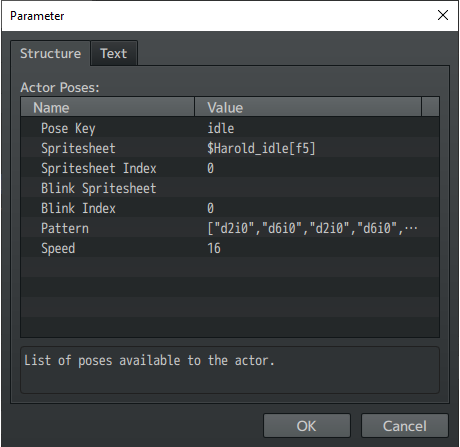
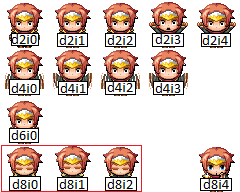
Ok, for this pose I want Harold to turn to the player and wave his arms for attention. It doesn't matter which direction he is facing before entering idle, he should always turn to the player. Also, I'll cut short and add sprites for the second idle pose and one we'll use on part 3 in the same spritesheet. Here's the spritesheet:
It's a single character file, so the index will be 0. And we're also ignoring blinking this time, so the Blink Spritesheet can be left blank. Another interesting thing is that now we have more than 3 sprites per row. For the plugin to work with that extra sprites, we need to let it know how many sprites we have. We do that using the correct naming pattern: $Harold_idle[f5].png
We add the $ at filename start to tell the engine it's a single character file, then add a [f5] anywhere before the file extension to tell the plugin we have 5 spites per row. You can adjust it to different sprite setups if you want, just make the number in the pattern correspond to the your number of sprites (replace <n> with the correct number: [f<n>]).
Before we start, we need to figure out which sequence of sprites to use. Here's how I want the movement to happen:
Wow! That's a long animation (16 frames, to be precise). Well, now that we know which sprites and which order to follow, how do we setup our animation pattern?
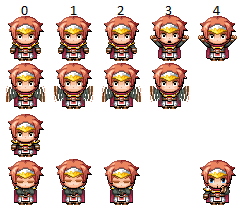
First thing you need to know is that character sprites also have indexes. Basically, each collumn of sprites has an index assigned starting in 0:
In our case, since we have 5 frames in the spritesheet, our index goes from 0 to 4.
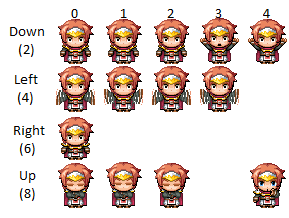
Second, each row represents a direction, considering default sprite organization. Internally, the engine uses number to reference each direction. Those numbers are the same you see in your num pad:
In words: we use 2 for down, 4 for left, 6 for right and 8 for up. By default, RPG Maker spritesheets goes with the first row for the facing down pattern, the second for the facing left, third for facing right and the last one for facing upwards. So we use this to reference each sprite direction when setting up our pose pattern.
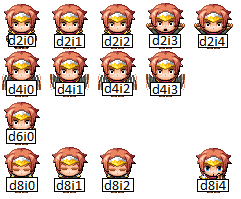
To summarize, here's a map for our file:
To reference each row in our pattern setup we can use the letter 'd' (for direction), and each column with the letter 'i' (for index). That means that the upper left sprite is the 'd2i0', the second 'd2i1', and so on. If we jump to the second row, it becomes 'd4i0', 'd4i1', etc. The same goes for the third row (d6i0, d6i1, etc.) and the fourth one (d8i0, d8i1, etc.).
Placing this map over the image, here's all sprite pattern keys:
With this map we can now translate that long sequence of sprites into keys:
d2i0, d6i0, d2i0, d6i0, d2i1, d6i0, d2i2, d2i4, d4i0, d4i1, d4i2, d4i3, d2i3, d2i3, d4i0, d2i0
We then load that sequence into the Plugin Manager in the Pattern parameter and define how fast the plugin will jump from one sprite to the next. We'll use 18, which is close to the engine default speed. When we finish loading parameters, here's how our pose config looks like:
Now save and check the results by having Harold stay in place for a few seconds.
Well, this was a pretty complex pose. But let's get to the second and easier one, shall we?
Idle pose 2
This is an alternative idle pose where we have Harold crossing his arms and turnng to the player. There will be a simple head movement, and that's that. It uses just three sprites, which I've circled in red below:
From what we learned from the main idle pose, here's how this second idle pose setup looks like:
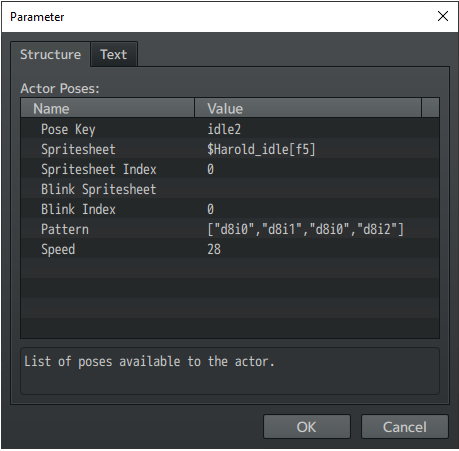
Here our pattern goes from d8i0 sprite to d8i1, then back to d8i0, then d8i2 and then it starts all over again. In this case we want the movement to be a bit slower, so we change the speed to 28 instead of the normal 18.
-----------------------------------------------------------------------
That's it. Both idle poses are ready to go. I'll see you on part 3, where we'll talk about Harold's balloon poses.
Comments
Log in with itch.io to leave a comment.
for some reason, the idle animations show up whenever in dialogue with an npc. how do i fix this?
As of the current version, you need to use plugin commands to disable / enable the idle pose to prevent it from starting at an unwanted moment. Check the help file for specifics depending on which engine you are using!