Plugin Tutorial Part 4 - Event Pose Templates
This is the final post in a four part tutorial series to help you work with TAA_CharacterPoses plugin. On previous post we handled Harold's poses (default, dash, idle and balloon poses). In this last part we're focusing on events.
All configurations described here are already done in my sample project, which you can download here.
OBS: All images used in the tutorial series were taken from the MV editor. If you're an MZ owner don't worry, the setup I'll explain here is pretty much the same on both. The only difference is really on Plugin Commands, which are actually easier to use in MZ than MV.
Default vs Common Templates
The plugin provides two different sets of configurations for event poses templates:
- Default templates: Are automatically loaded and made available for all events, as long as the corresponding spritesheet image file is found in your game img/characters folder. You can disable this using event notes or comment tags, but we'll not get into details here (take a look at the sample project event's comments for some examples);
- Common Templates: This works as a pose library. They are not loaded and made available for your events unless you do so with note or comment tags. It allows you to reuse pose setups for different events, and prevents them to be loaded for all events (specially if you define poses using the reserved names default, dash or idle);
Pose templates are slightly different from actor poses. They are more flexible (and probably more confusing), so that you can configure one template and apply it to as many events as you'd like. To allow this, templates do not reference an image file directly. The same goes for sprite set indexes. Both settings are evals that are interpreted by the plugin at runtime, which also means you need to be careful when exporting your finished game, as the "Exclude unused files" option won't be able to identify this files.
tl;dr;
Common templates need to be manually loaded into an event through notes and comments, while default templates are always loaded into all events, unless explicitly stated otherwise through notes and comments.
Setting up a Default Template for blinking
We're going to setup one simple default template to allow all our characters to blink. To do that we first need to know what are the allowed tags when configuring Spritesheets and Indexes.
Let's start with the Spritesheet parameter. Since we're defining a template, we don't want this parameter to reference a single file, otherwise we won't be able to reuse this pose for multiple events. If you consider that each event has its own sprite set on its own spritesheet file, we could use its file name as a base and create a pattern for reuse. For example, you can define a pattern where blinking sprites will always be located at the same file as normal sprites. Or, like I do in my sample project, create a file name pattern to identify blinking sprites. For example: People1.png has its corresponding blinking sprites in the file People1_blink.png.
Long story short, you can tell the plugin to use the event character file by setting the Spritesheet parameter to '%{char}'. If you want to use a different file for your pose, you can just add the desired pattern to the parameter text. For example: %{char}_run, or %{char}_idle, or %{char}_whateveryouwant, and so on. For this particular pose, we'll keep the original file name: %{char}
Likewise, you can also set a dynamic Spritesheet Index. So you can reference another sprite set from the same file, for example. To use the same Sprite Set index originally configured for the event, set this parameter to '%[index}'. If you want to reference another index from the same file, you can performe math using the %{index} tag. For example, to use the next index, set it to %{index}+1. Just keep in mind that this number must be between 0 and 7. Again, for our particular pose we'll keep the original sprite set index: %[index}
Parameters Blink Spritesheet and Blink Index are pretty similar, with just a couple of additional tags. Let's say you're setting up a running template that uses the %{char}_run file, and you want to add blinking sprites to the pose. You could set Blink Spritesheet to %{char}_run_blink, OR, you could use %{pose}_blink. The %{pose} tag references the Spritesheet parameter, so you can build a pattern over the pattern. The same goes for Blink Index, where you can use %{index} to reference the event original sprite set index, or %{pIndex} to reference the Spritesheet Index parameter.
For our purposes here, we'll set the Blink Spritesheet to %{pose}_blink and Blink Index to %{pIndex}. We'll leave Pattern blank, as we want the default engine pattern to be used. Since it's inteded to be a walking pose, the Pose Key will be 'default'.
Here's how our template setup:

Save your project and check the results. As long as the blinking files are present for the NPC, you see them blinking without further actions!
Next, let's setup a common template and load it to an event.
Laughing pose template
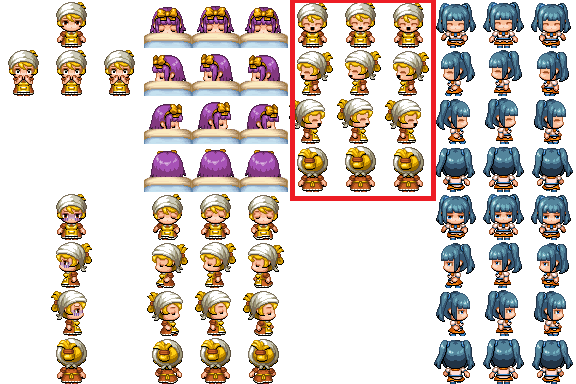
To setup this pose we'll use the People1_emotes.png file you can find inside my sample project. We'll need specifically the circled sprites below:
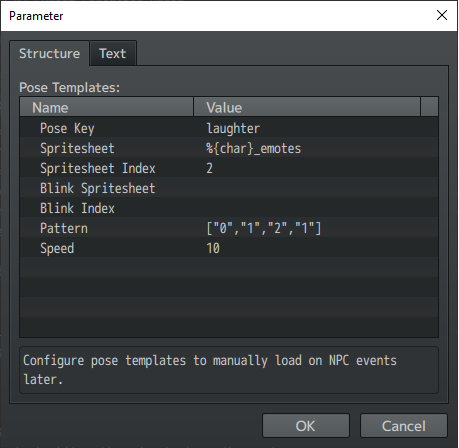
For this pose, we'll set the Pose Key to "laughter". We will keep the Spritesheet parameter dynamic setting it to %{char}_emotes, but the Spritesheet Index will be fixed (2). We won't have blinking sprites for this pose (as she is actually with her eyes already closed).
However, we're going to set a custom pattern here (it's not really custom, as we're staying on the engine defaults, but bear with me on this exercise). In this pose we want the event to keep it's original direction and simply cycle through the pattern moving its head like it is laughing. So we don't want to me as precise as we were in part 3 of this tutorial. We just need to tell the plugin which sprite set index to use. I want it to start at index 0, go through 1, then 2 and then come back to 1 before restarting the pattern. So, let's just set the pattern as: 0, 1, 2, 1. We also want the movement to be a bit faster than normal, so let's set Speed to 10.
Here's our final setup:
But wait there, we're not done yet. This is a common template, so we now need to add it to the event library before we can use it. There's basically two ways to do that, which we'll cover below.
Using Notes
This approach will load the pose for all event pages, so it is always available. You can read details on how the note tags work in the help file and check some examples in the sample project, here we'll focus only on how to add this specific pose to our event.
To add a pose to the event library we need the "lib" tag. So, here's what we need to add to the event notes:
<TAA_CP: lib:laughter>
You can add as many templates as you want, just separate them with a comma. For example: <TAA_CP: lib:laughter,crying,scared>
Using Comment Tags
You can use comment tags to add poses to an event that should affect only the current event page. Comment tags can also be used to create new poses for the event, but we won't get into details here (you can find a few examples in the sample project). Your comment can be place anywhere in the event contents, as long as it starts with the <TAA_CP> tag, which tells the plugin there's something there to parse. You also don't need to fit everything in the same comment command, but I advise adding a closing tag (</TAA_CP>) when you finish to prevent the plugin from searching more tags through the rest of the event contents. Also, each character poses tag should be placed in a separate line.
After writing the opening tag, use the tag cpLoad to load templates. For example, here's what it will look like to load our laughter pose:
<TAA_CP>
cpLoad:frightened
</TAA_CP>
As with notes, you can add multiple poses using one tag, just separate them with commas:
<TAA_CP>
cpLoad:frightened,crying,scared
</TAA_CP>
-----------------------------------------------------------------------
After loading the pose into the event, you can call it through Plugin Commands. In MV, the command would be "SetAnimatedPose", while MZ uses the "Set Character Pose" with the "Is Animated" option set to true.
And that's it! Your poses are good to go!
There are more features, like creating poses through comment tags, running plugin commands or script calls and so on. But I've decided to keep this tutorial as simple as I could manage. All those features are present in my sample project and I believe once you understand how poses are setup using this other things won't be that hard. But, let me know if I'm mistaken and I'll consider creating another tutorial!
Thanks to everyone who took their time to give me feedback on this plugin, and those who are using it. Let me know when your projects are release so I can check them out!
Happy RPG Making everyone!
Leave a comment
Log in with itch.io to leave a comment.